Shopify SEO – Step-by-Step
Shopify is one of the world’s most popular e-commerce solutions, with 600,000+ businesses using it to host their online store. The platform is feature rich; comes with attractive templates; and ultimately offers its users a very easy way to sell goods – either physical or digital – online.
However, it’s one thing creating a nice-looking, well-specced website using Shopify; quite another to deliver organic traffic via SEO to it. So in this post, we’re going to delve into the SEO functionality of the platform and provide some key tips on how to make a Shopify store rank in search results.
Below you’ll find a checklist of key things you need to do to maximise the chances of your Shopify site appearing in search results. Some tasks on the checklist apply to optimising any website, but we’ve aimed to provide pointers that are as specific to Shopify SEO as possible.
1. Register your Shopify store with Google Search Console and Bing Webmaster Tools
Registering a site with Google Search Console and Bing Webmaster Tools is something all website owners who are serious about SEO should do, regardless of the platform they’ve used to construct it.
By registering your site with these two important services you are telling the two major search engines that your website exists, and are ensuring it gets crawled.
One thing you should remember with these services is that you should register BOTH the www and non-www version of your domain (i.e., www.yourdomain.com and yourdomain.com), and, if you’ve got a secure and non-secure version of your website, the https:// and https:// versions of each.
Registering a Shopify site with Google Search Console and Bing Webmaster Tools is pretty straightforward – but for more information please see the below resources:
2. Submit your Shopify store’s sitemap to Google Search Console and Bing Webmaster Tools
Once you’ve registered your Shopify site with Google Search Console and Bing Webmaster Tools, you’ll need to submit an XML sitemap to both services – this helps both services index your site accurately and quickly.
Helpfully, Shopify generates a sitemap automatically for you – the URL for this on your store is simply www.yourdomain.com/sitemap.xml – and you just need to enter this link into Google Search Console and Bing Webmaster Tools.
In both Search Console and Bing Webmaster Toosl you do this by going to your site’s dashboard, and then clicking ‘sitemaps.’

3. Ensure your Shopify store is loading as fast as it can
Page speed is a signal used by search engines to rank websites, with fast-loading sites given preference over slower ones.
Your options with regard to reducing page speed are a bit limited with Shopify — because rather than being able to buy your own hosting and code your own template, you have to use Shopify’s servers and their templates (which, whilst perfectly good, don’t give you fine-grain control over the speed with which your site loads).
That said, there are some things you can do to make a Shopify site load as quickly as possible:
- Use compression tools like Tiny Png to reduce the size of any images you’re uploading to Shopify.
- Keep use of any external scripts or custom code on your site to a minimum.
- Avoid using a large number of web fonts on your site, or even consider ditching them entirely in favour of web safe fonts (these load faster).
- Use Accelerated Mobile Pages (AMP) format for your Shopify pages and posts – this displays extremely fast-loading versions of your content in mobile search result. AMP content is sometimes prioritised by Google in results (it’s more likely to appear in its ‘Top Stories’ carousels) and because pages in AMP format load so quickly on mobile devices, they’re more likely to be read (thus increasing the dwell time on your content, which many SEO experts believe to be a positive ranking signal). To use AMP with Shopify, you’ll need to install and pay for a third-party app like RocketAmp, but I’d argue that it’s worth it.

4. Get your page titles right
One of the most significant elements of a web page is its title: search engines treat it as a key piece of information when working out how to categorise and rank it, and your title itself shows up as the largest component of a search result (as well as at the top of browser windows).
You should ensure your Shopify page and post titles are never vague in nature, and start with your ‘focus keyword’ (the phrase you want to rank for in search).
For example, if you run a business called “John’s Cars”, which is located in Brooklyn and specialises in Volkswagen car sales, you are better off using a page title which includes the phrase ‘Volkswagen Cars Brooklyn’ instead of a more conventional (but less SEO friendly) ‘John’s Cars’.
A good page title for the above example would be ‘Volkswagen Cars Brooklyn — John’s Cars.’ (Note: there are various keyword research tools that can help you find out which phrases are actually searched for on search engines (popular ones include Ahrefs and Moz’s Keyword explorer).
In Shopify, there are two different processes for editing page titles: one for your home page, and one for every other type of page.
Editing your Shopify home page title
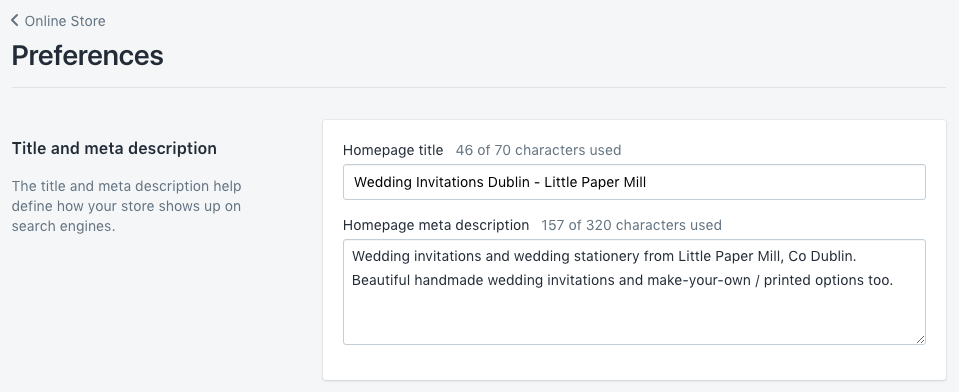
To edit your home page title, you need to click Sales Channels > Online Store > Preferences. Then, use the box provided to enter your home page title.

Editing the home page title in Shopify
Editing other page titles in Shopify
For other pages, the method you use to edit a page title in Shopify is more or less the same, regardless of whether you’re working with a static page, product or post.
You need to locate your page, product or post in the Shopify dashboard — once you’ve found it, it’s simply a case of scrolling down to the bottom of it and clicking the ‘Edit website SEO’ link. You’ll then be able to edit the page title (along with your meta data and URL – see below).

Editing page titles in Shopify
5. Use headings properly
Ignoring headings is a common mistake made by people who build and update their own websites using platforms like Shopify. Instead of applying headings correctly (H1, H2, H3 etc.) to their text – as a developer or webmaster might do – they add bold or capitalised text to break up their content.
This causes quite a few problems: first, from a aesthetics point of view it can look pretty bad. Second, it makes it harder for visually impaired visitors to your site using screen readers to understand your content. And third – and of most relevance here – it makes it more difficult for search engines to index your content properly.
So make sure you read up on headings and how to apply them properly to your text before you upload content to your Shopify site!
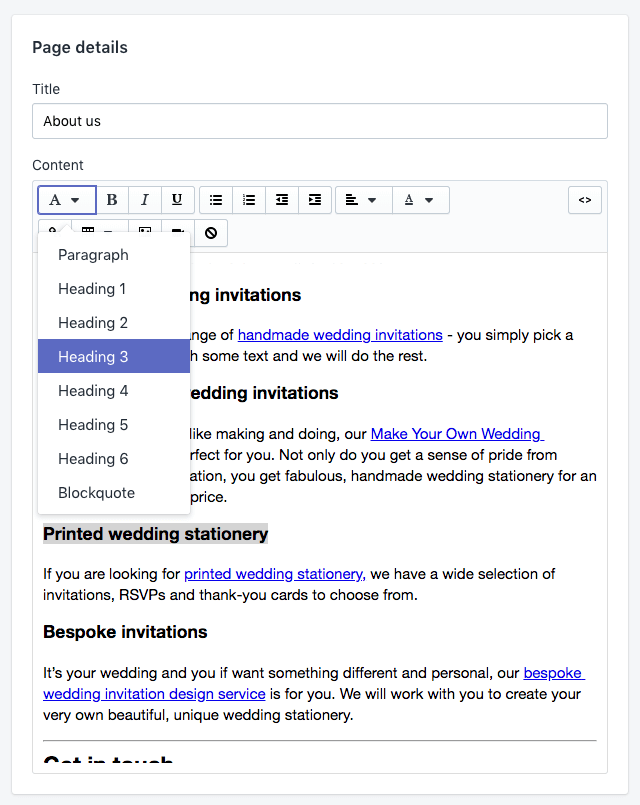
In terms of adding headings and subheadings in Shopify, it’s very easy: when editing a page, you just highlight a piece of text and then choose your desired heading from the formatting drop down menu, as per the screenshot below.

To add a heading in Shopify, highlight the relevant text and then choose the heading type using the formatting bar.
Of all the heading types, your H1 is the most important, because search engines use it (along with the page title) as a primary way of ranking the page. So it should always include (and ideally start with) your focus keyword.
7. Use engaging meta descriptions
Meta descriptions provide short summaries of web pages, and usually appear underneath the blue clickable links in a search engine results page.
Although Google says that they aren’t a ranking factor, a well-written meta description can encourage more clickthroughs to your website – which raises the clickthrough rate (CTR) of a page. The CTR of a page is generally believed by most SEO experts to be a ranking factor, so getting meta descriptions right is very important.
Your meta description should:
- be concise (under 300 characters)
- accurate
- contain the keyword you are hoping to rank for.
As with page titles, different processes apply depending on whether you want to edit your home page meta description or the description for any other page.
To edit your home page’s meta description, you’ll need to click Sales Channels > Online Store > Preferences and use the box provided on the right of the screen to add or change it.
To edit a meta description for other types of pages, you just need to locate your page, post or product and then click the ‘Edit website SEO’ link.
(See Section 5 above for screengrabs).
8. Use alt text and optimised file names with your images
Search engine algorithms don’t just look at the words on your website when indexing your site; they factor in your images too.
To do this, they look at two bits of data associated with your pictures: ‘alt text’ and file names. Accordingly, you need to ensure both are up to scratch from and SEO perspective.
There are three main reasons why you should add alternative text (‘alt text’) to your images:
- Screen readers use it to provide a description of an image to any visually impaired users who visit your website.
- Search engines use it to categorise and better understand your content.
- If your image fails to load, a description of will be displayed to help avoid confusion.
You should aim to add alt text that works for both screen readers and search engines — a description that that contains your focus keyword but is still perfectly understandable to anybody who is using a screen reader to access your content.
Editing alt text is very straightforward in Shopify.
Adding alt text to Shopify pages or posts
For images on pages or posts, you just locate the relevant picture and double click on it. You’ll then see a box appear which allows you to edit various aspects of the image, including alt text.
Adding alt text to Shopify products
For product images, you simply locate the relevant picture, hover over it and then click the word ‘ALT.’

Click the ‘ALT’ icon to change the alternative text for a Shopify product
You’ll then see a box appear which gives you the option to edit your alt text.

Editing image alt txt in Shopify
Changing image file names in Shopify
Changing file names is actually not particularly easy in Shopify — so it’s best to get your file names right before you upload them to the platform. This essentially means ensuring your focus keyword is in the file name, and that the file name is short.
For example, if you are selling blue toy airplanes in your Shopify store, ensure that the image you upload is called ‘blue-toy-airplane.jpg’ instead of something indecipherable like ‘IMG9481JXA-583.jpg’
If you do have to change an image file name after you’ve uploaded it to Shopify, then it’s unfortunately going to be a case of deleting your existing image and replacing it with a re-uploaded version that contains your focus keywords in its file name.
Obviously if you have an existing Shopify store containing thousands of products, this could be a massive job — so you may have to weigh up the time involved vs the benefit of tweaking the file names.
Whilst it’s definitely a good thing to use optimised file names with your pictures, there are other aspects of SEO which might be better focussed on instead (for example, keyword research or backlink building — you can download our ‘Super Simple SEO’ e-book for more details on these important areas).
A compromise in the above scenario might be to change the image file names of products that are particularly important to your business, and which you are particularly keen to see strong search engine results for.
9. Use clean URLs
Using ‘clean’ URLs with a simple structure is encouraged by Google. Clean URLs are short, simple and intelligible: as an example, if you were selling blue guitars, it would be advisable to use a URL of www.yourdomain.com/blue-guitars rather than www.yourdomain.com/prds/ct/p223.php?ref=14556bluegtr
Now with Shopify, the good news is that you’re not going to end up with unwieldy URLs like the latter example, but unfortunately the platform nonetheless generates URLs in a way that is slightly less clean than we might like.
This is because the platform adds prefixes to your pages and products, i.e.,
- /pages/ before pages
- /posts/ before posts
- /products/ before products
Strictly speaking this isn’t ideal from an SEO perspective, but it’s not going to stop you ranking highly in search results, as there are many other ranking signals which will take priority over this.
What I would say is that you should still aim to ensure that whatever comes after the above prefixes is as ‘clean’ as possible, and includes a focus keyword. The focus keyword helps both search engines and humans understand what your content is about more easily.
To edit a page URL in Shopify, go to the page, product or post you wish to edit, scroll down to the bottom of it and then click ‘Edit Website SEO.’
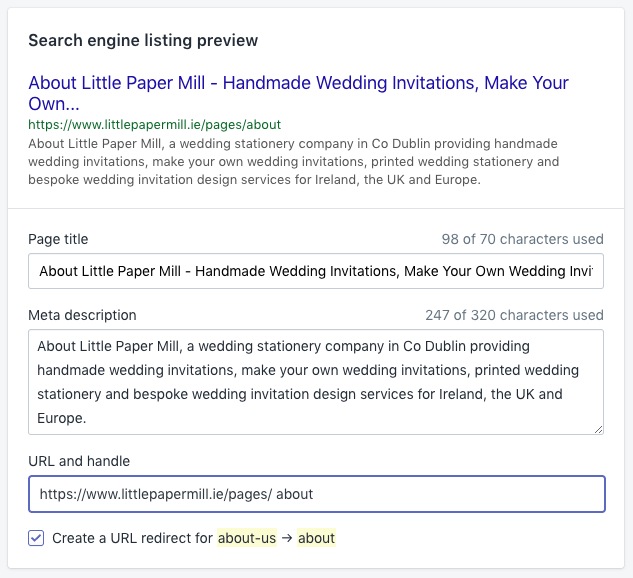
Then, make your changes in the ‘URL and handle’ box (see screenshot below). If you DO change a Shopify URL, make sure that you tick the ‘create URL redirect’ option. This lets Google knows that you have changed the URL.

Changing URLs in Shopify for SEO purposes – if you do make a change, don’t forget to tick the ‘create URL redirect’ box!
Note: changing URLs of pages that aren’t currently performing in search results is usually a good idea — but if you are contemplating changing a page that IS already ranking highly, you should tread carefully.
This is because a high-ranking page is likely to have a lot of backlinks to it, and these don’t count for quite as much if you change its URL (and won’t count for anything at all if you don’t create a redirect from your old URL to the new one).
Changing a URL can also affect the ‘social proof‘ of a page because it will reset the stats displayed on your social shares counter for that page to zero.
So in an ideal world, it’s good to get the URL structure right at the point at which you create your Shopify page or product, or shortly afterwards.
And if you do end up changing a page URL on your Shopify store, always check that ‘Create a URL redirect’ box!
10. Add rich snippets to your content
Rich snippets – data that can be added to your content to help both searchers and search engines understand what a page is about – are an important part of how your website behaves in search results (check out this Search Engine Journal article about rich snippets to find out why).
Rich snippets feature visual clues about the content of a page or post – for example, star ratings, author, prices and so on – which appear just below the page/post title and before the meta description, as per the example below:

Example of a rich snippet. Using them can help improve a search result’s CTR, which can in turn ultimately improves its position in search.
Rich snippets are typically generated through the addition of ‘Schema Markup’ – HTML code featuring tags defined by Schema.org (a collaborative project involving Google, Yahoo!, Bing and Yandex aimed at helping webmasters provide more accurate information to search engines).
There are a couple of ways to add rich snippets to a Shopify store. The first is to add some ‘data markup’ code to your Shopify templates (you’ll find some more information about this along with a code example here).
The second approach is to use a rich snippets app — there are tons of these available from the Shopify app store.
Either way, it makes sense to add rich snippets as they can help increase the click-through rate (CTR) of search results (something many SEO experts believe to be a positive ranking signal).
Either way, it makes sense to add rich snippets as they can help increase the click-through rate (CTR) of search results (something many SEO experts believe to be a positive ranking signal).
11. Assess the quality of your on-page SEO
On-page SEO is a set of steps that are taken to ensure that as many ‘ranking signals’ as possible are present on an individual page.
These include:
- Using headings properly
- Making use of ‘LSI keywords’
- Positioning your focus keywords early on in your content
- Adding long-tail keywords to your content
- Optimising images correctly
We’ve touched on some of these above, but there are many other things you need to do to ensure your on-page SEO is of a high standard.
One way of checking that you’ve ticked all the relevant boxes is to make use of an SEO-checking app from the Shopify App store – there are several available which check the quality of your on-page SEO and supply a report containing a list of things you need to do to improve it.
We will continue to update StoreFix.co; if you have any questions or suggestions, please contact us!
